
This guide explains how to align the print heads in WellPrint after replacing a print head, carriage board, or whenever print registration is incorrect.
The alignment process consists of three procedures:
- Bi-Directional Alignment
- Horizontal Alignment
- Vertical Alignment
Before You Begin
Before performing any alignment:
- Verify all print heads have a good nozzle check.
- Load the neck label used for alignment.
- Take a screenshot of your current settings before you change any values
- Perform the alignments in the order shown below.
1. Bi-Directional Alignment
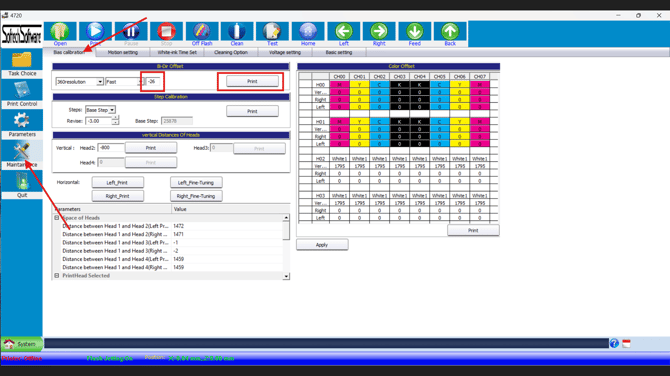
- Click on Maintenance.
- Select the Bias Calibration tab.
- Under Bi-Dir Offset, select the appropriate:
- Resolution: 360 resolution
- Print Mode: Fast
- Click Print.
- Review the printed bi-directional test pattern.
- Adjust the Bi-Dir Offset value until the pattern is properly aligned.
- Click Apply.
- Reprint the calibration pattern.
- Repeat until the pattern is properly aligned.
Important: After every adjustment, click Apply before printing another test. The printer will not use the new value until Apply is selected.
Note
Bi-Directional Alignment is the only alignment procedure that uses a printed calibration pattern.
2. Horizontal Alignment
Horizontal alignment is performed using the neck label that contains the fine-line box surrounding the small text.
Unlike Bi-Directional Alignment, there is no printed calibration pattern.
Step 1 – Print Left Direction
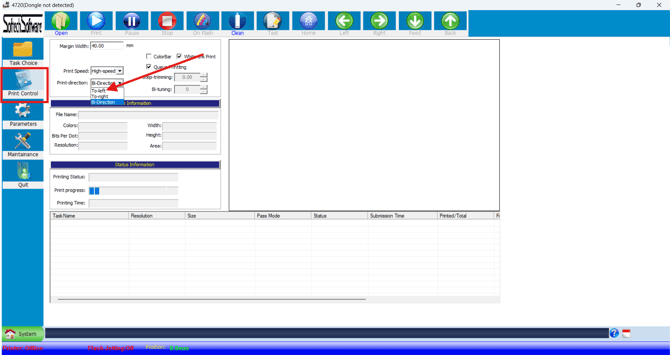
- Open Print Control.
- Change Print-direction to Left Only.
- Print the neck label.
Step 2 – Align Color Head #2 to Color Head #1
.png?width=670&height=377&name=Alignment%20-%20Color%20Head%202%20to%20Color%20Head%201%20(Horiz).png)
- Adjust Distance between Head 1 and Head 2 (Left Print) until Color Head #2 is horizontally aligned with Color Head #1.
- Click Apply.
- Print the neck label again.
- Repeat until the alignment is correct.
Adjustment Direction
- Increase the value to move the head left.
- Decrease the value to move the head right.
Important: Click Apply after every adjustment before printing another test.
Step 3 – Align White Head #3 to Color Head #1
.png?width=670&height=377&name=Alignment%20-%20White%20Head%203%20to%20Color%20Head%201%20(Horiz).png)
- Adjust Distance between Head 1 and Head 3 (Left Print) until White Head #3 is horizontally aligned with Color Head #1.
- Click Apply.
- Print the neck label again.
- Repeat until the alignment is correct.
Adjustment Direction
- Increase the value to move the head left.
- Decrease the value to move the head right.
Important: Click Apply after every adjustment before printing another test.
Step 4 – Align White Head #4 to Color Head #1
.png?width=670&height=377&name=Alignment%20-%20White%20Head%204%20to%20Color%20Head%201%20(Horiz).png)
- Adjust Distance between Head 1 and Head 4 (Left Print) until White Head #4 is horizontally aligned with Color Head #1.
- Click Apply.
- Print the neck label again.
- Repeat until the alignment is correct.
Adjustment Direction
- Increase the value to move the head left.
- Decrease the value to move the head right.
Important: Click Apply after every adjustment before printing another test.
Step 5 – Repeat for Right Direction
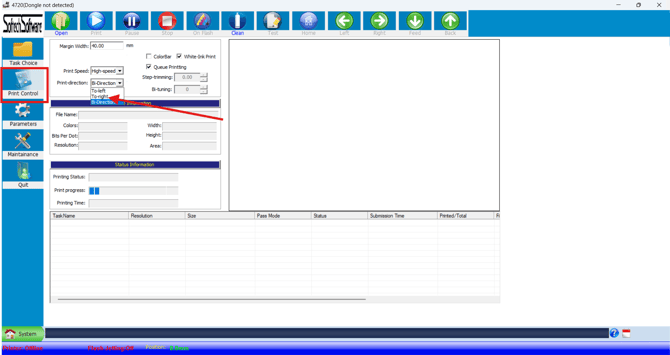
- Return to Print Control.
- Change Print-direction to Right Only.
- Print the neck label.
- Repeat the horizontal alignment process using the following Right Print values:
- Distance between Head 1 and Head 2 (Right Print)
- Distance between Head 1 and Head 3 (Right Print)
- Distance between Head 1 and Head 4 (Right Print)
- Click Apply after every adjustment before printing another neck label.
Adjustment Direction
- Increase the value to move the head left.
- Decrease the value to move the head right.
3. Vertical Alignment
Vertical alignment is performed using the neck label.
Only the white print heads require vertical adjustment. The color print heads are used as the reference.
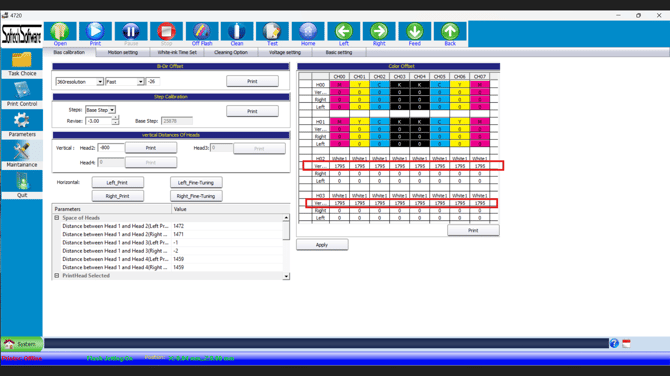
- Print the neck label.
- Compare the white print to the color print.
- Adjust the Vertical values for:
- White Head #3
- White Head #4
- Apply the same value to all eight channels (CH00–CH07) for the head being adjusted.
- Click Apply.
- Print the neck label again.
- Repeat until the white print is vertically aligned with the color print.
Important
Whenever changing a vertical value:
- Update all eight channels (CH00–CH07).
- Every channel must contain the same value.
- Never adjust individual channels independently.
Example
| CH00 | CH01 | CH02 | CH03 | CH04 | CH05 | CH06 | CH07 |
|---|---|---|---|---|---|---|---|
| 1800 | 1800 | 1800 | 1800 | 1800 | 1800 | 1800 | 1800 |
Important: Click Apply after every adjustment before printing another test.
Alignment Summary
Perform the alignments in the following order:
- Complete the Bi-Directional Alignment.
- Set Print-direction to Left Only.
- Align Color Head #2 to Color Head #1.
- Align White Head #3 to Color Head #1.
- Align White Head #4 to Color Head #1.
- Set Print-direction to Right Only.
- Repeat the horizontal alignment for all three heads.
- Perform the Vertical Alignment for White Head #3 and White Head #4.
Important Reminder
After changing any alignment value, always click Apply before printing the next test.
This applies to:
- Bi-Directional Offset
- Horizontal Alignment (Left Print and Right Print)
- Vertical Alignment
If Apply is not clicked, the printer will continue using the previous settings and the printed result will not reflect your changes.