This page allows operators to:
-
run maintenance actions
-
adjust printhead position
-
configure color bar settings
-
control cleaning behavior
-
load ink into the system
These settings are typically used during startup procedures, troubleshooting, or printer calibration.
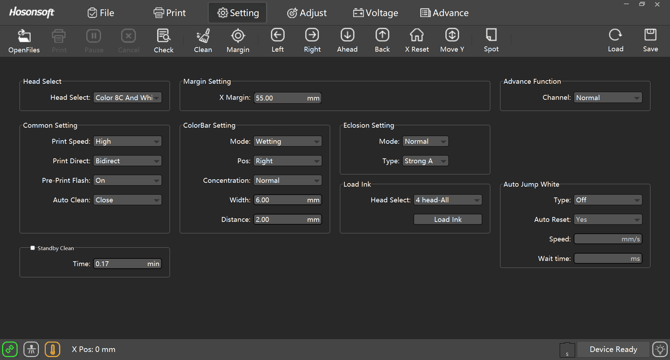
Top Toolbar Functions
The toolbar at the top of PrintEXP provides quick access to the most commonly used maintenance actions.
Open Files
Loads a print file into the software.
This option is rarely used in normal DTF workflows since most printing is sent through the RIP.
Check
Runs a nozzle check pattern to verify printhead performance.
Use this to confirm:
-
no missing nozzles
-
proper ink flow
-
printhead health
Clean
Runs a printhead cleaning cycle.
Cleaning cycles help remove partially dried ink from the nozzles.
Use this when:
-
nozzle check shows missing lines
-
print quality drops
-
printer has been idle for long periods
Margin
Opens the margin control tools used to adjust the starting position of prints.
This helps ensure prints begin at the correct location on the film.
Left / Right / Ahead / Back
These buttons move the carriage position manually.
They are typically used during:
-
printer setup
-
maintenance procedures
-
alignment checks
X Reset
Resets the printer’s X-axis home position.
This is used when the printer needs to reinitialize the carriage location.
Move Y
Moves the media feed forward or backward.
This helps position film correctly before printing.
Spot
Used for testing ink channels individually.
Primarily used during troubleshooting or technician diagnostics.
Load
Loads saved printer configuration settings.
Save
Saves the current printer configuration settings.
Settings Panels
The main area of the screen contains several configuration panels used to control printer behavior.
Head Select
The Head Select setting determines which printheads are being controlled.
Example:
Color 8C and White
This indicates the printer is operating with both color and white channels active.
Margin Setting
The X Margin controls where printing begins on the film.
Adjusting this value moves the starting point left or right.
Example:
55 mm
This is typically configured during printer installation and rarely changed during daily operation.
Common Settings
These options control general printer behavior.
Print Speed
Controls how fast the printer operates.
Example:
High
Higher speeds increase production but may reduce quality in some situations.
Print Direct
Controls the direction of printing.
Example:
Bidirect
Bi-directional printing increases speed by printing in both directions.
Pre-Print Flash
Controls whether the printer performs a brief pre-print action before starting.
Example:
On
Auto Clean
Determines whether the printer automatically runs cleaning cycles during operation.
Example:
Close
Color Bar Settings
Color bars are small ink strips printed along the edge of the film.
They help maintain stable ink flow during printing.
Settings include:
-
Mode – color bar behavior
-
Position – left or right side of the film
-
Concentration – amount of ink used
-
Width – width of the color bar
-
Distance – spacing between bars
These are typically configured during printer setup.
Eclosion Settings
This section controls how white ink behaves during printing.
Example:
Mode: Normal
Type: Strong A
These settings affect white ink strength and coverage.
Changing these values can affect opacity and print durability.
Load Ink
The Load Ink function pulls ink through the system and fills dampers.
Use this function during:
-
daily startup procedures
-
after replacing ink bottles
-
after ink system maintenance
Example:
Head Select: 4 head – All
This loads ink into all printheads.
Auto Jump White
This setting controls white ink behavior when printing areas without white.
Options include:
-
turning the feature on or off
-
setting movement speed
-
defining wait times
These settings are usually configured by technicians and rarely adjusted during daily use.
Standby Clean
Standby Clean automatically performs a cleaning cycle after the printer has been idle for a specified time.
Example:
0.17 minutes
This helps prevent ink drying inside the printheads.
Best Practices
When using the PrintEXP settings page:
-
only adjust values you understand
-
avoid changing calibration settings unnecessarily
-
run Load Ink and nozzle checks during daily startup
-
consult support before modifying advanced settings
Incorrect settings can affect printer performance.
Next Steps
Continue learning Hyper DTF maintenance and operation:
Hyper DTF – Daily Startup Procedure
Hyper DTF – Understanding Print Modes
Hyper DTF – Climate Control for DTF Printing
Hyper DTF – Ink Storage and Handling